Facial Hair Removal Tool Cleaning and Maintenance
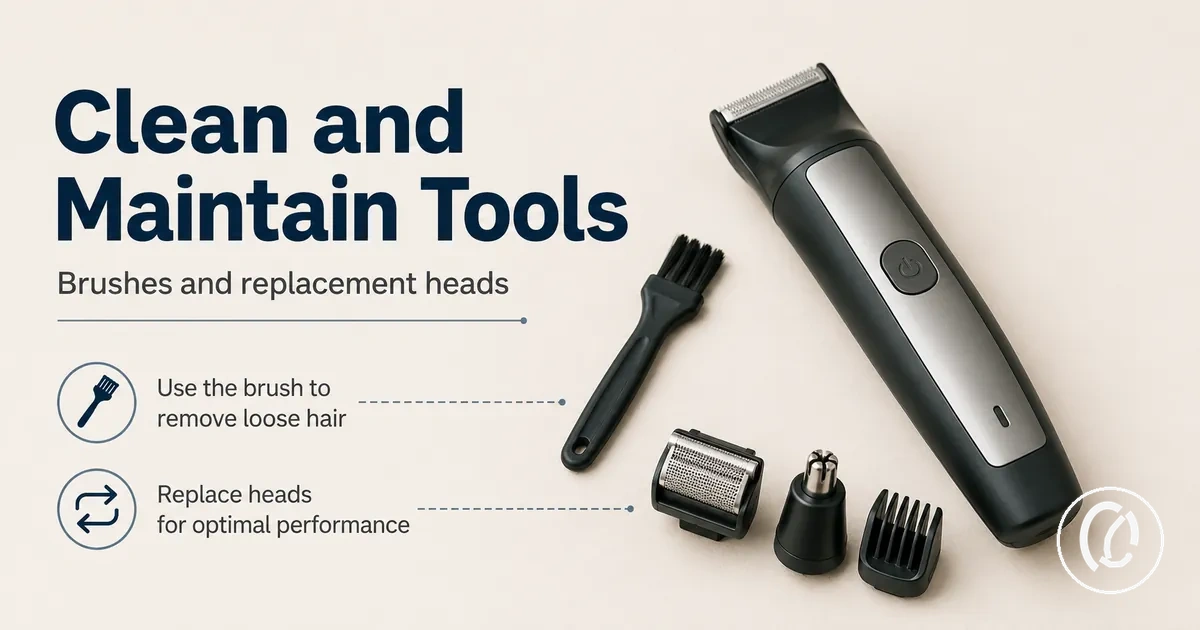
Facial hair removal tools require regular cleaning and maintenance to keep skin-contact parts hygienic, maintain cutting or removal performance, and reduce unnecessary wear over the product's service life. The correct maintenance method is conditional rather than universal because it depends on the tool type, removable components, waterproof or dry-clean-only construction, manufacturer instructions, and use frequency. Proper care keeps heads, blades, guards, and other tool parts cleaner while helping preserve hygiene and tool longevity.
Proper care keeps heads, blades, guards, and other tool parts cleaner while helping preserve hygiene and tool longevity.
Hair, skin debris, oils, and cosmetic residue can accumulate around heads, blades, foils, guards, and detachable components after normal use, reducing cutting efficiency and increasing wear if left in place. Manufacturers including Philips, Braun, and Panasonic specify different cleaning procedures for waterproof, rinseable, and dry-clean-only facial hair removal tools, meaning water exposure, sanitizing methods, and removable-part cleaning should always follow the instructions supplied for the specific model rather than a universal method. Replacement timing is likewise determined by manufacturer guidance, compatibility, and actual wear instead of a fixed schedule.
Replacement timing is likewise determined by manufacturer guidance, compatibility, and actual wear instead of a fixed schedule.
Facial hair removal tool maintenance combines routine cleaning, conditionally approved sanitizing, inspection of heads and blades for wear, appropriate replacement of compatible parts, and dry storage that protects the tool from unnecessary contamination and accidental damage. For example, a waterproof facial hair remover with a detachable rinsable head may be cleaned under running water if the manufacturer permits it, whereas a dry-clean-only model should instead be maintained with its supplied cleaning brush to avoid damaging internal components.
Tool hygiene should not be confused with skin aftercare.
Tool hygiene should not be confused with skin aftercare. This page focuses on cleaning and maintaining facial hair removal tools, while treatment of skin irritation, redness, or other post-removal skin reactions belongs to a separate care routine.
Table of Contents
Why Clean Tool Parts Matter for Facial Hair Removal Hygiene
Clean tool parts are essential for facial hair removal hygiene because heads, blades, guards, foils, and other skin-contact parts accumulate residue, trapped hair, skin debris, and skin oils during normal use. Removing this buildup helps keep contact surfaces cleaner, reduces persistent odor caused by retained organic material, and helps facial hair removal tools maintain their intended cutting or trimming efficiency. Manufacturers such as Philips specify cleaning the shaving head after each use to maintain hygienic performance and proper operation.
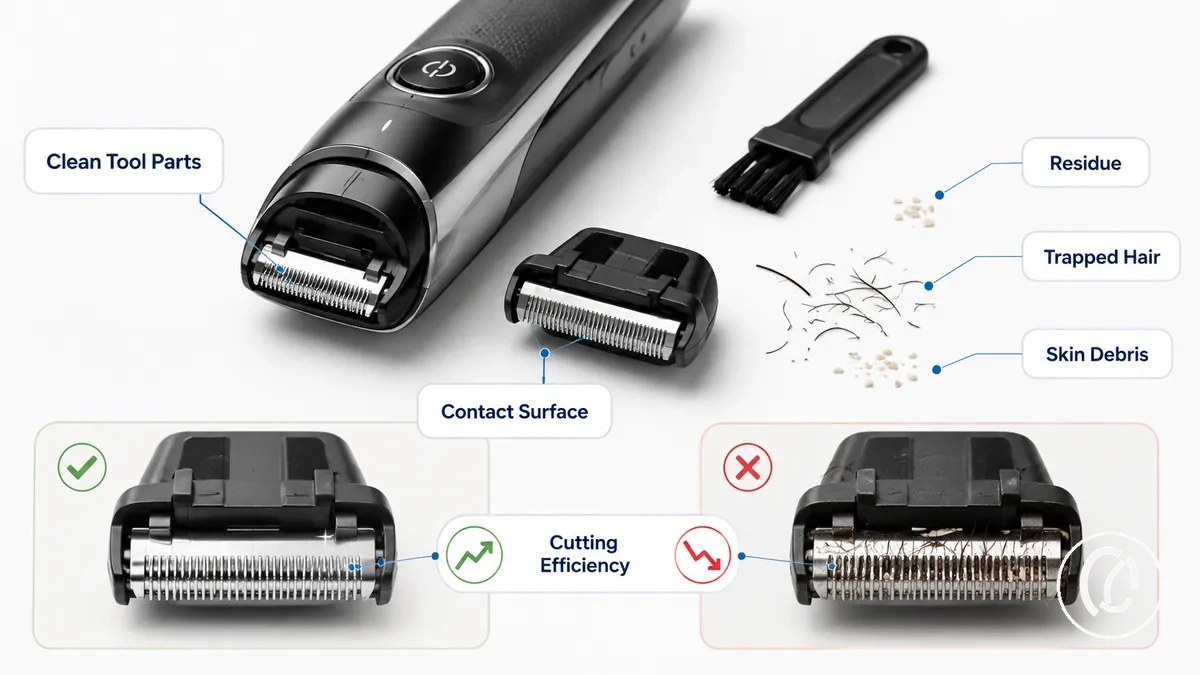
Residue and trapped hair can obstruct blade edges, foil openings, and guard channels, increasing friction between the tool and facial hair instead of allowing clean cutting. Philips states that damaged shaving heads should be replaced because damage can reduce shaving performance and contribute to skin discomfort, while the American Academy of Dermatology recommends replacing a manual razor blade after 5 to 7 shaves and storing it in a dry place to reduce contamination. For facial hair removal tools with replaceable heads, however, no universal replacement interval exists because compatible replacement timing depends on the manufacturer's specifications and the condition of the cutting components rather than a fixed number of uses.
For guidance on reducing avoidable hygiene and handling risks during operation, follow recommended safe use and cleaning habits .
Cleaning facial hair removal tools supports facial hair removal hygiene, but it does not treat skin irritation or replace appropriate skin care after hair removal. If redness or irritation persists after the tool has been cleaned and inspected, the concern should be evaluated as a skin-care issue rather than a tool-cleaning issue. For guidance on reducing avoidable hygiene and handling risks during operation, follow recommended safe use and cleaning habits.
Tool Parts That Affect Cleaning and Replacement
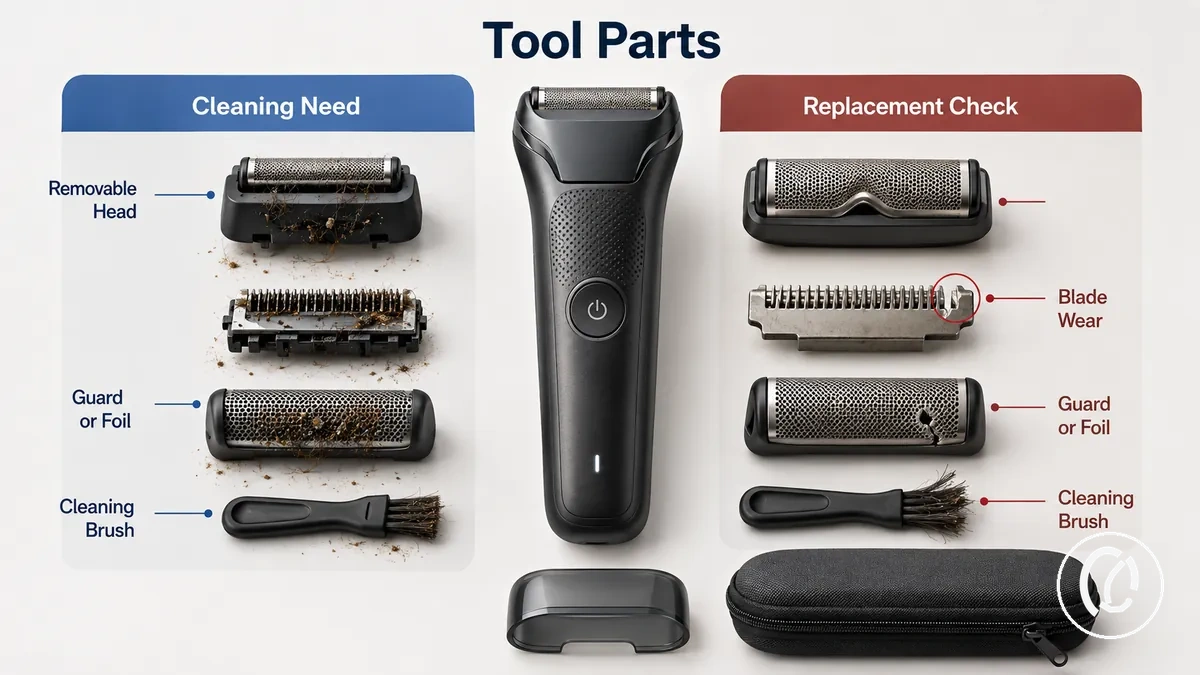
Tool parts create different cleaning and replacement requirements based on their function and the manufacturer's design. Heads, blades, guards, foils, cleaning brushes, and protective caps each have a different cleaning burden, while replacement depends on wear, damage, or the manufacturer's model-specific instructions rather than a universal schedule. Inspecting these parts before cleaning helps determine whether routine maintenance is sufficient or whether a replaceable component should be changed.
| Part | Cleaning attribute | Replacement condition | Effect on hygiene or performance |
|---|---|---|---|
| Heads | Remove trapped hair, skin debris, oils, and cosmetic residue after each use if the head is removable or washable. | Replace when cracked, damaged, worn, or when the manufacturer specifies a compatible replacement head. | Maintains clean skin-contact surfaces and consistent hair removal. |
| Blades | Clean with the supplied cleaning brush or rinse only if the manufacturer approves washing. | Replace when dull, chipped, bent, or cutting performance noticeably declines. | Helps reduce hair pulling and preserves cutting efficiency. |
| Guards or foils | Remove trapped hair carefully without bending or deforming the contact surface. | Replace if torn, bent, cracked, or otherwise damaged. | Supports even skin contact and predictable trimming or shaving performance. |
| Cleaning brush | Remove accumulated hair and dust after every cleaning session. | Replace only when the bristles become worn or ineffective. | Improves cleaning of heads, blades, and foils. |
| Cap or storage case | Keep clean and dry before storing the tool. | Replace if broken or unable to protect the tool from dust or accidental damage. | Helps keep cleaned contact parts protected during storage. |
The cleaning burden and replacement condition are separate maintenance attributes. Routine cleaning removes residue from tool parts after every use, whereas replacement restores performance only after wear or physical damage affects the component. Manufacturers such as Philips, Braun, and Panasonic distinguish between removable, washable, and dry-clean-only parts in their product documentation, so the model number should be checked before washing or ordering compatible replacement parts.
The cleaning burden and replacement condition are separate maintenance attributes.
For example, a removable washable head can normally be detached and cleaned after each use if the manufacturer's instructions allow it, but replacement is required only when inspection reveals damage, excessive wear, or loss of cutting performance rather than after a fixed number of cleaning cycles. Before comparing removable and replaceable components, review the features that affect maintenance.
Heads, Blades, Guards, and Foils
Heads, blades, guards, and foils are the primary cutting or contact parts of a facial hair removal tool, and each has a distinct maintenance role. Heads hold the cutting assembly, blades remove hair, guards or foils form the contact surface against the skin, and their removability is determined by the manufacturer's design rather than a universal standard. Identifying these parts helps distinguish removable hair buildup from physical wear that may require a compatible replacement component.
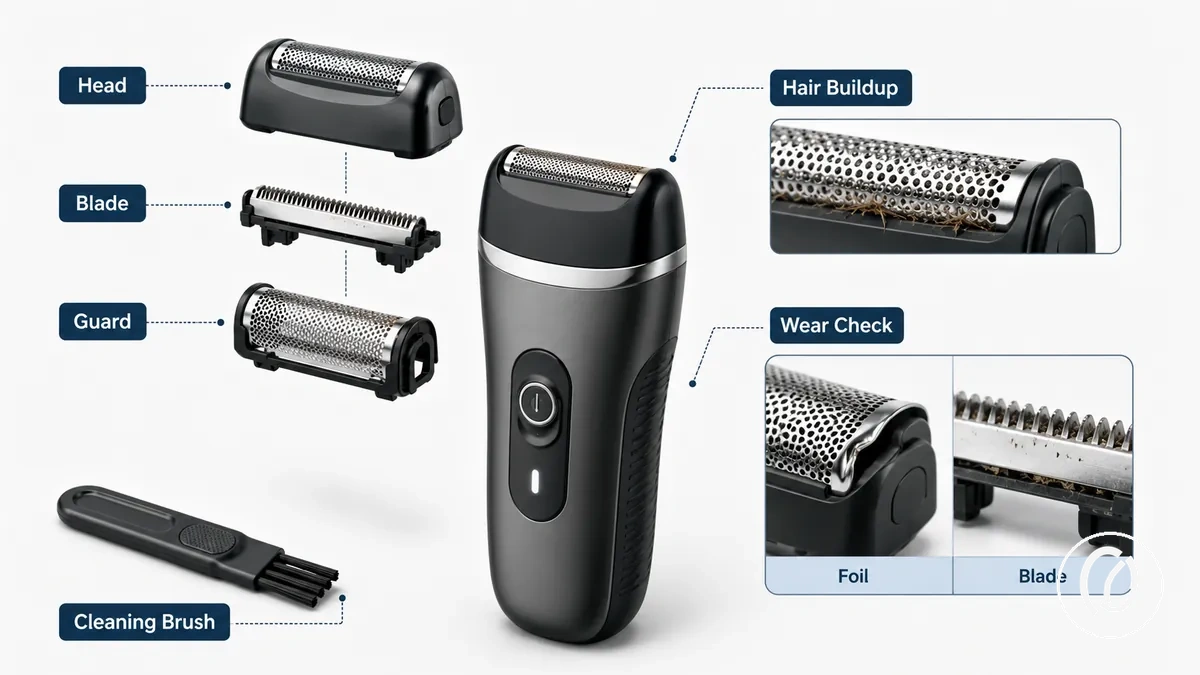
- Heads: A removable head can be detached for approved cleaning if the manufacturer provides that feature. Cracks, distortion, or excessive wear indicate a condition that cleaning cannot correct.
- Blades: Blades are the cutting parts most affected by hair buildup and dullness. Residue can often be removed with a small cleaning brush, while chipped, bent, or persistently dull blades represent wear rather than remaining debris.
- Guards and foils: Guards guide hair toward the blade area, and foils provide the contact surface between the cutting parts and the skin. Trapped hair and cosmetic residue are cleanable conditions, whereas bent or torn foil screens are wear conditions that should be assessed using the manufacturer's replacement guidance.
A practical example is a removable head that continues to pull facial hair after visible residue has been brushed away. In that situation, the remaining symptom is more consistent with blade dullness or foil wear than with hair buildup, so the manufacturer should be consulted to determine whether the specific head or foil assembly is replaceable for that model. :contentReference[oaicite:0]{index=0}
Cleaning Brushes, Caps, and Storage Cases
Cleaning brushes, caps, and storage cases are maintenance accessories that support facial hair removal tool care by removing loose debris, protecting clean contact parts, and providing dry storage. Their primary function is maintenance support rather than replacing worn cutting components, so they should be evaluated by accessory condition instead of blade wear. Brush stiffness, cap fit, storage case ventilation, and contamination risk are the key attributes that determine whether these accessories continue to support safe storage and routine cleaning. :contentReference[oaicite:0]{index=0}
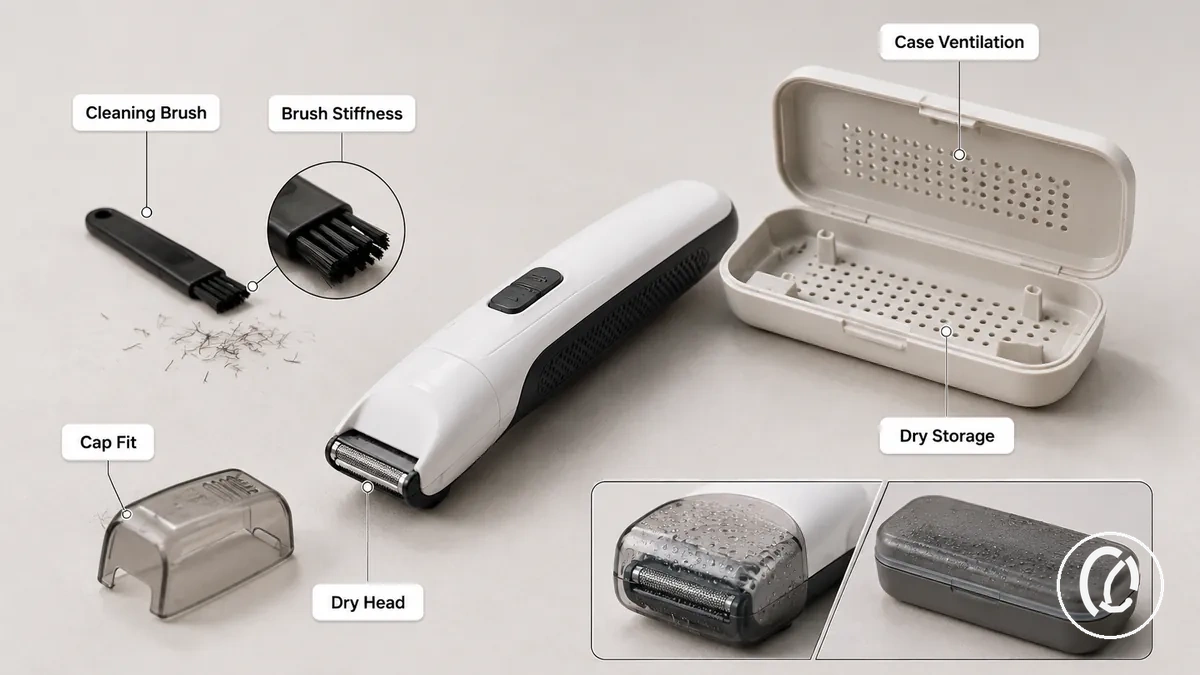
The following accessories support maintenance without becoming replacement parts:
- Cleaning brush: Check that the brush stiffness remains firm enough to remove trapped hair from the tool head without bending delicate cutting or contact parts. Replace the brush only if damaged or no longer able to clean effectively.
- Cap: Confirm that the cap fits securely over a clean, dry head. A cap protects contact surfaces from dust during storage, but placing it on a damp tool can retain moisture and increase contamination risk.
- Storage case: Keep the storage case clean and reasonably ventilated before storing the tool. A dry case supports organised storage and travel, whereas residual moisture inside a closed case can contribute to contamination if the tool has not dried completely.
For example, after loose hair has been removed with a cleaning brush and the tool head has dried completely, fitting the cap and placing the tool inside a clean storage case helps reduce exposure to dust during storage. These accessories improve maintenance support but do not restore dull blades, damaged foils, or other replacement-level wear conditions. :contentReference[oaicite:1]{index=1}
Waterproof, Rinseable, and Dry-Clean-Only Designs
Water exposure for a facial hair removal tool depends on its design label rather than whether the tool is manual or electric. A waterproof, rinseable, or dry-clean-only design each has different cleaning permissions, so the manufacturer's label or user manual should be checked before exposing any part of the tool to water. The design label determines whether the whole device, only a removable head, or no component should be cleaned with water. :contentReference[oaicite:0]{index=0}
A removable head does not mean the complete tool is waterproof.
A removable head does not mean the complete tool is waterproof. If the manufacturer specifies that only the removable head is rinseable, the detached head may be rinsed and dried before reassembly, while the handle, charging contacts, and battery compartment should remain dry unless the entire product is explicitly labelled as waterproof. This boundary separates rinsing an approved detachable part from wetting the complete device and helps reduce moisture exposure to electrical components. :contentReference[oaicite:1]{index=1}
The comparison below shows how each design label changes the permitted cleaning method.
The comparison below shows how each design label changes the permitted cleaning method.
| Design label | What may be cleaned | What to keep dry |
|---|---|---|
| Waterproof | The complete tool may be rinsed with water only when the manufacturer labels the entire device as waterproof. | Follow the manual if charging contacts or charging ports must remain dry during cleaning. |
| Rinseable | Only the removable head or other specifically identified detachable parts may be rinsed. | The handle, charging contacts, and battery compartment remain dry unless separately identified as waterproof. |
| Dry-clean-only | Use a cleaning brush or another manufacturer-approved dry brushing method to remove hair and debris. | Keep the complete tool, including the handle, charging contacts, and battery compartment, away from water. |
For example, if a facial hair removal tool has a rinseable removable head but a dry-clean-only handle, only the detached head should be rinsed, dried completely, and reattached before storage, while the handle is cleaned without water. The correct cleaning method is determined by the manufacturer's waterproof or rinseable designation rather than by assuming that all electric tools or all manual tools can be washed. :contentReference[oaicite:2]{index=2}
How to Clean Facial Hair Removal Tools After Use
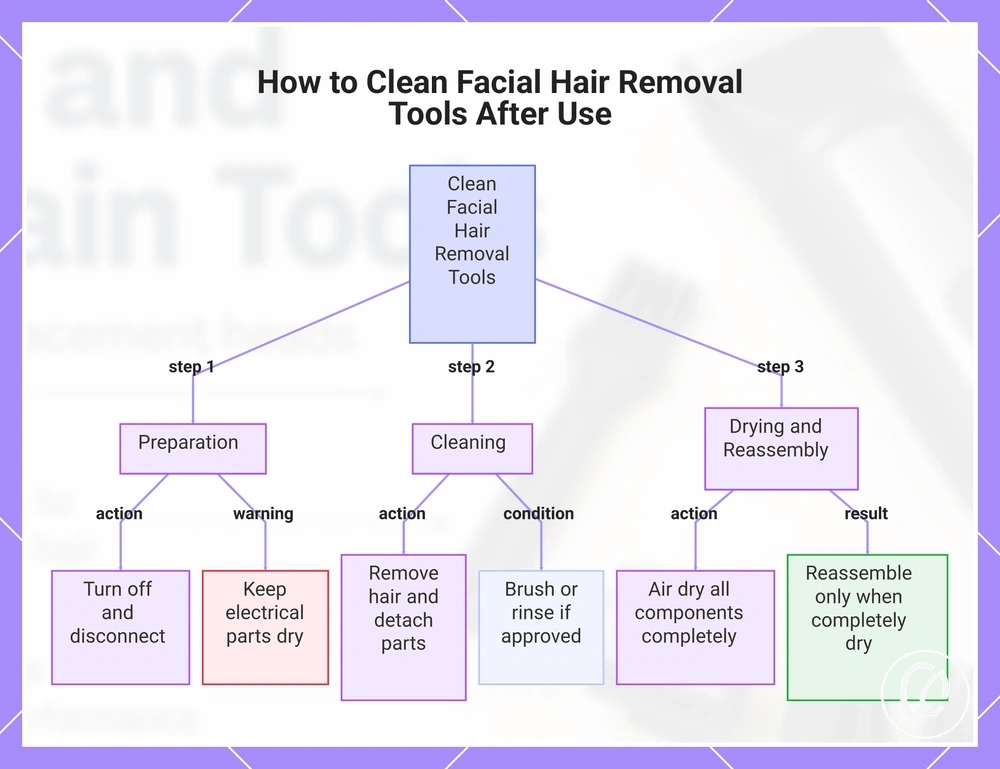
Clean facial hair removal tools after each use by turning the tool off, removing loose hair, cleaning only the parts approved by the manufacturer, drying every cleaned component thoroughly, and reassembling the tool only after it is completely dry. According to manufacturer care instructions for facial hair removal devices, the correct after-use cleaning method depends on the tool's design, such as whether it has a rinseable head, a fully waterproof body, or a dry-clean-only construction. :contentReference[oaicite:0]{index=0}
Complete each step in order because a rinseable head, removable parts, and a dry-clean-only handle require different cleaning actions.
Following the correct cleaning sequence helps remove hair and residue before they accumulate around the head chamber and cutting parts while reducing unnecessary moisture exposure to electrical components. Complete each step in order because a rinseable head, removable parts, and a dry-clean-only handle require different cleaning actions.
- Turn off the tool. Switch the device off and disconnect it from its charger before cleaning. Keep charging contacts and electrical connections dry unless the manufacturer specifically states they are waterproof.
- Remove hair. Brush away loose hair from the head, blade area, foil, guard, and head chamber using the supplied cleaning brush. Remove visible residue before proceeding to deeper cleaning.
- Detach approved parts. Remove only the head or other approved parts identified as detachable in the user manual. Do not force fixed components apart because doing so may damage the tool.
- Clean the residue. Brush remaining debris from the cutting area. If the tool has a rinseable head, rinse only that approved part with water or mild soap when permitted by the manufacturer, while keeping a dry-clean-only handle away from water.
- Dry thoroughly. Shake excess water from washable components and allow every cleaned part to air dry completely on a clean, dry surface before putting the tool back together. For example, reattaching a damp head can trap moisture inside the assembly, whereas complete drying helps keep internal parts clean before storage. Continue following these safe use and cleaning habits whenever maintaining the tool.
- Reassemble. Put the approved parts back together only after they are completely dry, fit the protective cap if supplied, and store the facial hair removal tool on a dry surface to help reduce dust and moisture exposure between uses.
For example, a facial hair removal tool with a rinseable removable head can be cleaned by brushing away loose hair, rinsing only the detached head if approved, air drying it completely, and then reassembling it before storage, while a dry-clean-only model follows the same sequence without any water exposure. This condition-based process preserves the manufacturer's intended cleaning method instead of applying one universal approach to every facial hair removal tool. :contentReference[oaicite:1]{index=1}
This condition-based process preserves the manufacturer's intended cleaning method instead of applying one universal approach to every facial hair removal tool.
This chart outlines the step-by-step cleaning process for facial hair removal tools, including the condition-based method for rinseable and dry-clean-only designs.
Removing Trapped Hair and Skin Debris
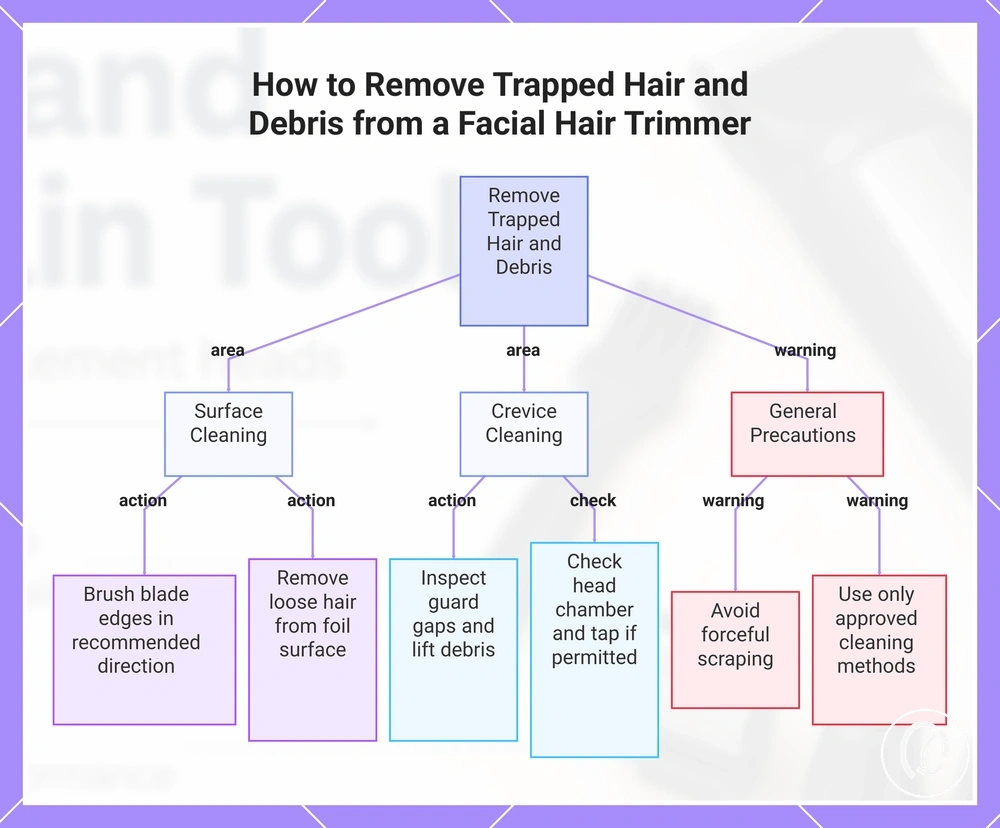
Trapped hair and skin debris should be removed by checking the blade edges, foils, guard gaps, and head chamber for visible buildup, then clearing each accessible area with a cleaning brush using gentle motion. According to manufacturer cleaning guidance for facial hair removal tools, debris should be brushed away after use, while any tapping or access to internal parts should only follow the instructions provided for the specific model. Review the locations below before moving to the next cleaning step. :contentReference[oaicite:0]{index=0}
- Blade edges: Brush along the blade edges in the recommended brush direction to lift trapped hair and skin debris without wiping across the cutting edge.
- Foils: Remove loose hair from the foil surface with gentle motion. Do not press or bend the foil while cleaning.
- Guard gaps: Inspect the guard gaps for visible buildup and lift debris out carefully with the cleaning brush instead of pushing it deeper into the crevices.
- Head chamber: Check the head chamber for loose hair. If the manufacturer permits, use gentle tapping to dislodge loose material before brushing it away.
- Caution: Avoid forceful scraping during cleaning because repeated pressure can damage delicate cutting or contact parts. Use only cleaning methods approved for the specific tool model. :contentReference[oaicite:1]{index=1}
This chart shows the key cleaning areas and precautions for removing trapped hair and skin debris from a facial hair removal tool.
Cleaning Removable Heads Without Wetting the Handle
Removable heads should be cleaned with water only when the manufacturer identifies the detached part as rinseable. Detach the removable head before wet cleaning, keep the powered handle and charging port dry, and use only the cleaning method stated in the product instructions. :contentReference[oaicite:0]{index=0}
- Detach the removable head. Separate the head from the handle only when the manufacturer identifies it as detachable, and keep the powered handle away from water.
- Rinse the approved part. Rinse the detached head with lukewarm water only when it is classified as rinseable. Use mild soap only when the manufacturer permits it for that part.
- Protect the handle. Keep the handle and charging port dry throughout cleaning. Remove exterior residue with the manufacturer-approved dry method rather than exposing non-approved electrical areas to water.
- Dry and reattach. Allow the removable head to dry completely before reattaching it to the handle, because moisture around the connection point can remain trapped after reassembly. :contentReference[oaicite:1]{index=1}
Drying and Reassembling the Tool Before Storage
Drying and reassembling a facial hair removal tool before storage means allowing every cleaned component to dry thoroughly, confirming that all removable parts are fitted correctly, and storing the tool only after no visible moisture remains. According to manufacturer care instructions, cleaned removable heads should air dry before reassembly, and the tool should not be covered with a cap or placed into a storage case while any component is damp. Use the final checks below to confirm the tool is ready for storage. :contentReference[oaicite:0]{index=0}
- Dry the removable head: Allow the removable head to air dry. If surface water remains, use gentle towel blotting without rubbing sharp parts before reassembling.
- Check seated components: Verify that all seated components are fully aligned and securely fitted so the tool is correctly reassembled before the cap or storage case is used.
- Wait before capping: Fit the cap only after every cleaned part is dry. Caution: Capping or storing a damp head can retain moisture inside the assembled tool, although drying alone does not prevent all hygiene issues. :contentReference[oaicite:1]{index=1}
- Confirm storage readiness: Place the fully reassembled dry tool into its storage case only after confirming that no visible moisture remains and every component fits correctly.
How to Sanitize Facial Hair Removal Tools Safely
Sanitizing a facial hair removal tool is a separate maintenance step from routine cleaning, and the correct sanitizing method depends on the tool material, water resistance, and the manufacturer's compatibility instructions. Routine cleaning removes visible hair and residue, while sanitizing is limited to cleaning media that are compatible with detachable parts, skin-contact surfaces, and electrical components. Universal sanitizing methods should not be used because manufacturers determine whether water, mild soap, alcohol-compatible products, or dry cleaning are suitable for a specific tool. :contentReference[oaicite:0]{index=0}
Sanitizing is not the same as sterilizing a device and should not be treated as a medical process.
Routine cleaning prepares the tool by removing visible debris, whereas sanitizing focuses on reducing remaining residue and contamination on compatible surfaces after cleaning. Sanitizing is not the same as sterilizing a device and should not be treated as a medical process. The criteria below distinguish washable detached parts, dry-clean-only parts, and skin-contact surfaces so that the cleaning medium matches the tool material and part condition. :contentReference[oaicite:1]{index=1}
| Part or surface | Allowed cleaning medium | Condition to check | Risk to avoid |
|---|---|---|---|
| Washable detachable parts | Mild soap and water only when the manufacturer identifies the detached part as washable | Confirm water resistance, dry completely before reassembly, and follow the specified drying time | Reassembling damp parts or exposing non-washable components to water |
| Dry-clean-only parts | Manufacturer-approved dry cleaning method only | Verify the handle or electrical section is designated dry-clean-only before cleaning | Water exposure or incompatible cleaning media that may damage electrical parts |
| Skin-contact surfaces | Disinfecting wipe only when alcohol compatibility is confirmed by the manufacturer | Check alcohol compatibility, surface finish, and recommended drying time before the next use | Using incompatible chemicals or assuming every surface tolerates alcohol-based products |
When to Use Soap, Water, Alcohol, or Dry Cleaning
Choose the cleaning medium for a facial hair removal tool according to the part material, design, residue type, and whether the component contains electrical components or is a washable removable part. Mild soap, water, alcohol, and dry cleaning each apply to different conditions rather than to the entire tool, so selecting the medium should match the specific part being cleaned. The checklist below helps match the cleaning medium to the correct part while reducing the risk of damaging the tool. :contentReference[oaicite:0]{index=0}
- Mild soap: Use mild soap only on washable removable heads when the manufacturer permits rinsing to remove skin oils, cosmetic residue, or other light residue. Avoid using soap on fixed handles or electrical sections.
- Water: Use water only on detachable parts identified as rinseable. Dry the cleaned part completely before reassembly, and keep the handle, charging contacts, and other electrical components dry.
- Alcohol: Use an alcohol-based wipe only when the skin-contact surface is confirmed to be alcohol compatible. Allow the surface to dry before reuse, and avoid alcohol on incompatible coatings or internal electrical parts.
- Dry cleaning: Use dry brushing with the supplied cleaning brush for loose hair, dry residue, and dry-clean-only areas, especially around electrical components where liquid cleaning is not approved.
- Washable parts and dry-clean-only areas: Use soap and water only for approved washable removable parts, while dry-clean-only areas should be cleaned only with dry brushing. Do not apply liquids near batteries or charging contacts.
Maintenance Differences Between Electric and Manual Tools
Electric tools and manual tools share the same hygiene objective of removing hair, skin debris, and residue after use, but their maintenance logic differs because of the power source, detachable parts, water exposure, blade wear, head wear, and storage sensitivity. Electric tools require maintenance that protects charging contacts and other powered components, while manual tools focus on maintaining blades and handles because they contain no electrical parts. These maintenance conditions determine how the same cleaning goal is achieved for each tool design. :contentReference[oaicite:0]{index=0}
The comparison below contrasts upkeep requirements rather than tool superiority.
The comparison below contrasts upkeep requirements rather than tool superiority. Both electric tools and manual tools should be cleaned, dried, and inspected after use, but the maintenance routine changes according to the tool's construction, removable components, and approved water exposure limits. :contentReference[oaicite:1]{index=1}
| Maintenance factor | Electric tool condition | Manual tool condition |
|---|---|---|
| Power source | Powered components and charging contacts must remain dry unless the manufacturer identifies the complete tool as waterproof. | No electrical components are present, so maintenance focuses on the cutting parts and handle material. |
| Water exposure | Only waterproof products or manufacturer-approved rinseable detachable parts should be exposed to water. | The complete tool may be rinsed only when its construction and manufacturer instructions permit water cleaning. |
| Detachable parts | Removable heads, guards, or attachments should be detached and cleaned only when designed for removal. | Replaceable blades or removable components should be cleaned after disassembly where the manufacturer provides that option. |
| Blade or head wear | Inspect heads, foils, and blades for dullness, bending, cracking, or damage that routine cleaning cannot correct. | Inspect blades for dullness, corrosion, or physical damage and replace them according to the manufacturer's maintenance guidance. |
| Brush use | Use a cleaning brush to remove trapped hair from the head assembly while avoiding unnecessary contact with powered areas. | Use a cleaning brush where appropriate to clear residue from blade edges and accessible parts before rinsing or drying. |
| Storage sensitivity | Store the tool only after every cleaned part is completely dry to help protect powered components from retained moisture. | Store the cleaned manual tool dry to help protect the cutting edge and reduce moisture retention between uses. |
This comparison focuses only on maintenance conditions, showing how cleaning decisions change according to tool construction rather than tool category. The same maintenance principles apply across different facial hair removal tools, while the correct upkeep method is determined by the design, removable parts, and manufacturer-approved cleaning conditions for each model. :contentReference[oaicite:2]{index=2}
When to Replace Facial Hair Remover Heads or Blades
Replace facial hair remover heads or blades when confirmed wear signs, the tool type, and use frequency show that approved cleaning no longer restores normal cutting performance. Replacement timing remains manufacturer-dependent because different models use different blade, foil, and head assemblies; where no interval is specified, visible condition and persistent performance loss provide the practical decision criteria. :contentReference[oaicite:0]{index=0}
Use the checklist below to separate a cleaning need from a replacement signal.
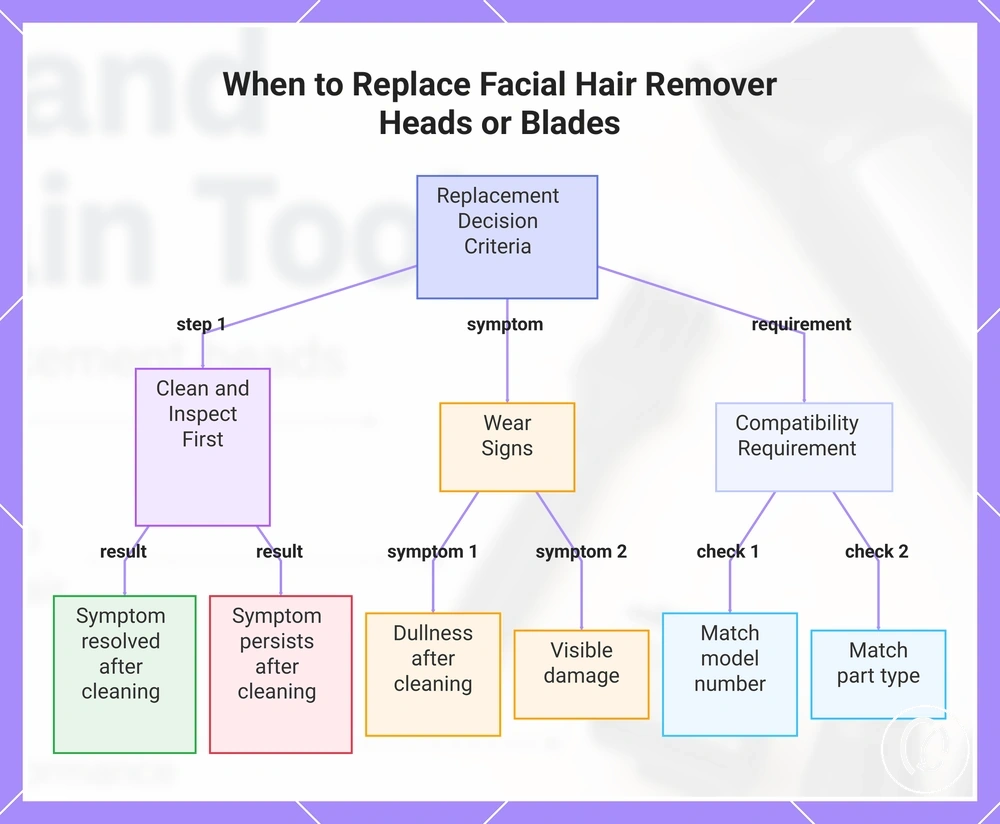
Residue buildup can cause temporary pulling or reduced performance, so clean and inspect the part before deciding to replace it. If the symptom remains after cleaning, or if dullness, visible damage, looseness, or an unresolved hygiene concern is present, the condition is more consistent with replacement-level wear. Use the checklist below to separate a cleaning need from a replacement signal. :contentReference[oaicite:1]{index=1}
- Pulling: If pulling stops after approved cleaning, residue was the likely cause; if pulling continues and the cutting part shows wear, consider replacing the head or blade.
- Dullness: A blade that remains dull and cuts less cleanly after cleaning is a meaningful wear sign and may require replacement.
- Visible damage: Replace cracked heads, chipped blades, bent foils, or torn screens because cleaning cannot correct physical damage.
- Reduced performance: If cutting efficiency does not return after residue is removed, inspect the blade, foil, or head for wear before further use.
- Head looseness: A removable head that no longer seats securely should be replaced when wear or damage prevents a stable fit.
- Blade or foil condition: Corrosion, deformation, permanent edge wear, or a damaged foil surface indicates a replacement signal rather than a cleaning need.
- Compatibility: Match any replacement head or blade to the manufacturer-specified model number and supported part type rather than assuming cross-model compatibility.
This chart shows the decision process for replacing facial hair remover heads or blades, including cleaning test, wear signs, and compatibility checks.
Replacement Timing by Tool Type and Use Frequency
Replacement timing for facial hair removal tool parts depends on the tool type, use frequency, and the presence of a confirmed wear signal rather than a fixed replacement schedule. According to the reviewed manufacturer maintenance guidance, replacement decisions should follow part condition after proper cleaning because no universal lifespan applies across different brands or tool designs. The table below organises replacement timing by tool part, use-frequency condition, wear signal, and likely action. :contentReference[oaicite:0]{index=0}
| Tool part | Use-frequency condition | Wear signal | Likely action |
|---|---|---|---|
| Electric heads | Frequent use with reduced cutting performance after approved cleaning | Persistent pulling, reduced performance, or worn cutting elements | Inspect the head and replace it if cleaning no longer restores performance, using the manufacturer-specified compatible replacement head. |
| Manual blades | Repeated shaving with routine cleaning after each use | Dull cutting edge or continued pulling during use | Replace the blade when sharpening or cleaning cannot restore normal cutting performance. |
| Foils | Regular skin-contact use | Bent, torn, cracked, or otherwise visibly damaged foil | Replace the foil because structural damage cannot be corrected through cleaning. |
| Guards | Repeated fitting and removal during normal operation | Loose fit, deformation, cracking, or damaged locating features | Replace the guard when it no longer maintains the intended trimming position or secure attachment. |
| Cleaning accessories | Continued maintenance use | Brush bristles become worn, bent, or ineffective at removing debris | Replace the cleaning accessory when it no longer cleans effectively, recognising that accessory wear does not indicate head or blade replacement. |
Compatibility Checks Before Buying Replacement Parts
Replacement parts must match the facial hair removal tool's model number and attachment mechanism before purchase because compatibility checks determine whether a replacement head or blade is designed for that tool. A similar appearance does not confirm fit, cleaning compatibility, or safe operation, so a generic part should not be treated as compatible without manufacturer confirmation. :contentReference[oaicite:0]{index=0}
Verify the exact model number on the tool or in its documentation, then compare the replacement part's head shape and blade type with the original component.
Verify the exact model number on the tool or in its documentation, then compare the replacement part's head shape and blade type with the original component. Compatible fit signals require all three criteria to agree with the manufacturer's listed part compatibility; a matching head shape alone is insufficient when the blade design or connection differs. :contentReference[oaicite:1]{index=1}
Compatible fit signals require all three criteria to agree with the manufacturer's listed part compatibility; a matching head shape alone is insufficient when the blade design or connection differs.
Complete the remaining fit check by separating confirmed compatibility signals from risk signals:
- Attachment mechanism: Verify that the replacement part uses the same locking, clipping, sliding, or twisting connection as the original; a different mechanism indicates a fit risk even when the outer shape appears similar.
- Waterproof rating: Confirm that the replacement part retains the waterproof or rinseable classification specified for the original removable part; an unverified rating can change the approved cleaning method.
- Official compatibility notes: Check the manufacturer's documentation for the exact model and supported replacement part; missing or conflicting notes are a risk signal rather than evidence that a generic part will fit.
Proceed only when the model number, head shape, blade type, attachment mechanism, waterproof rating, and official compatibility notes agree; otherwise, the unresolved mismatch should be treated as a reason not to assume compatibility. For wider selection criteria, use the buying guide with maintenance factors. :contentReference[oaicite:2]{index=2}
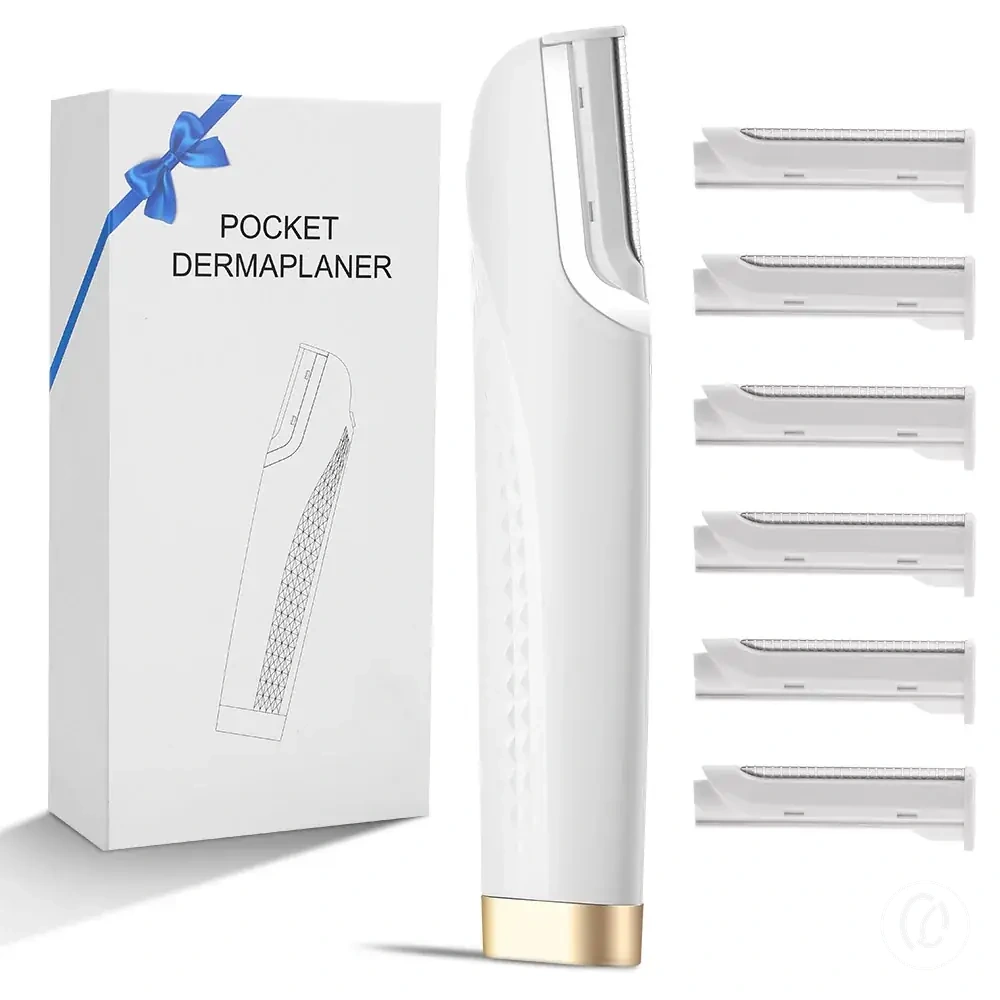
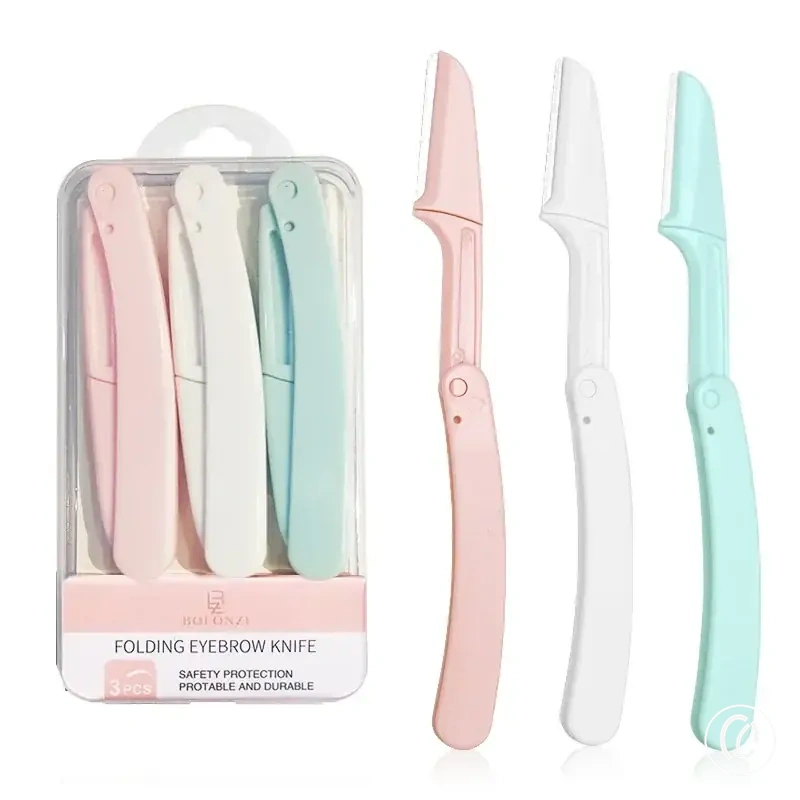
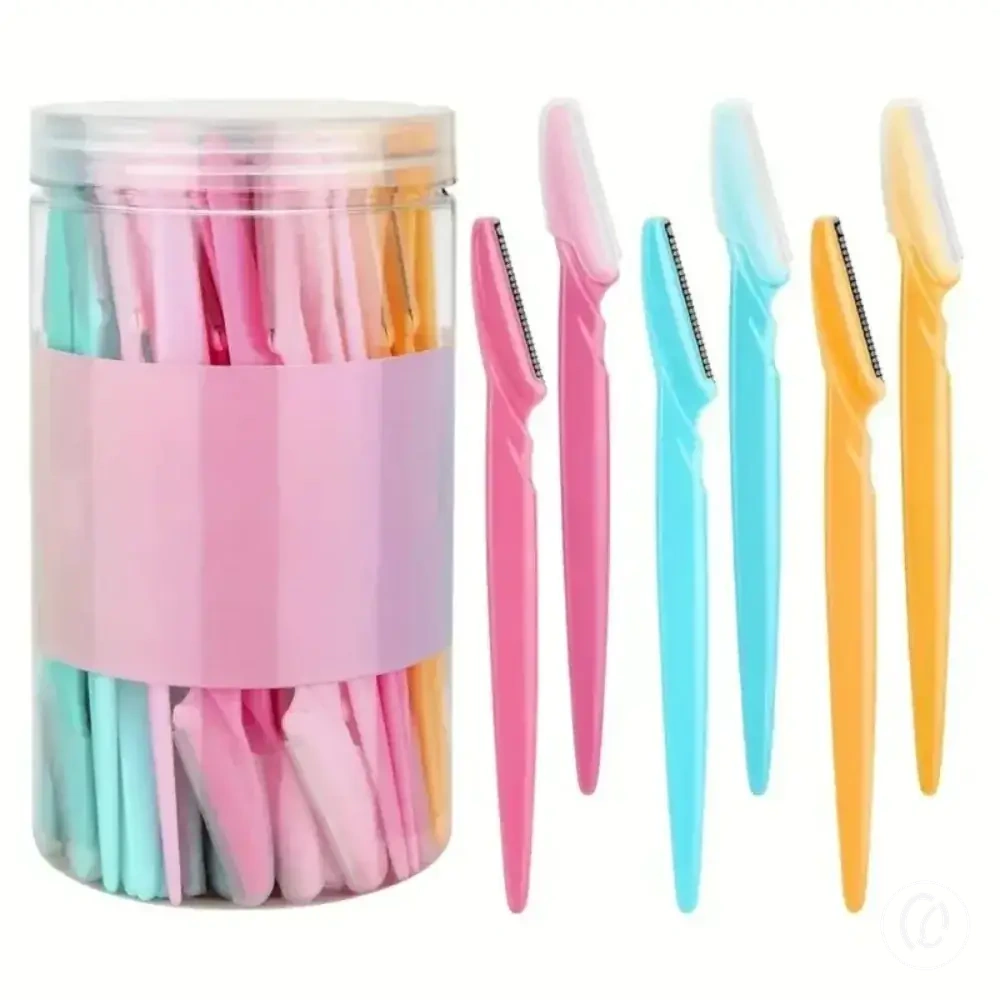
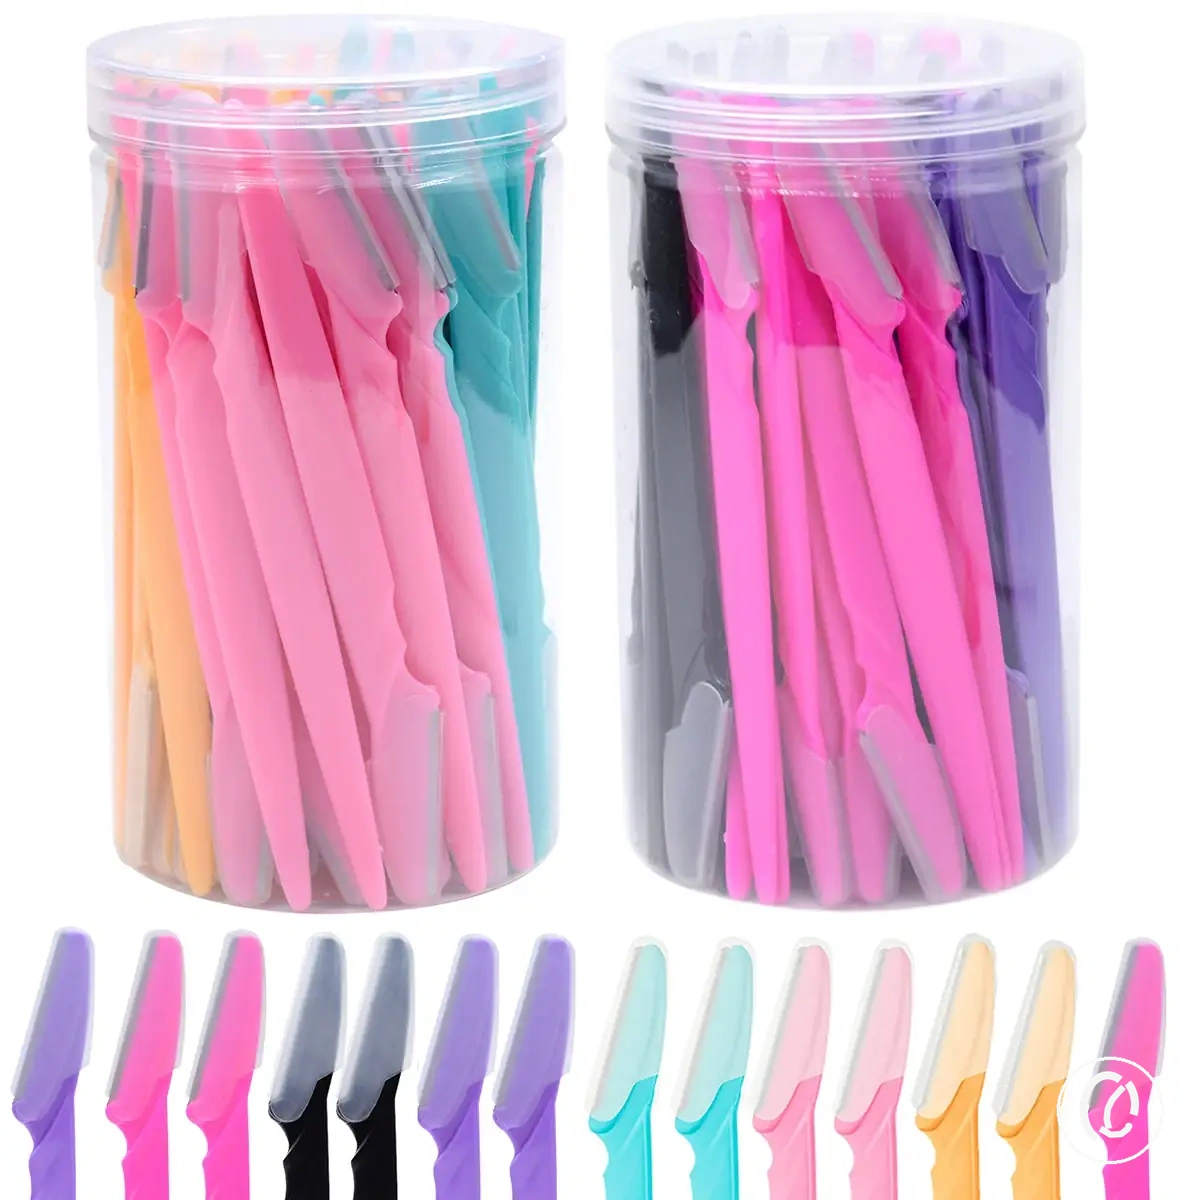
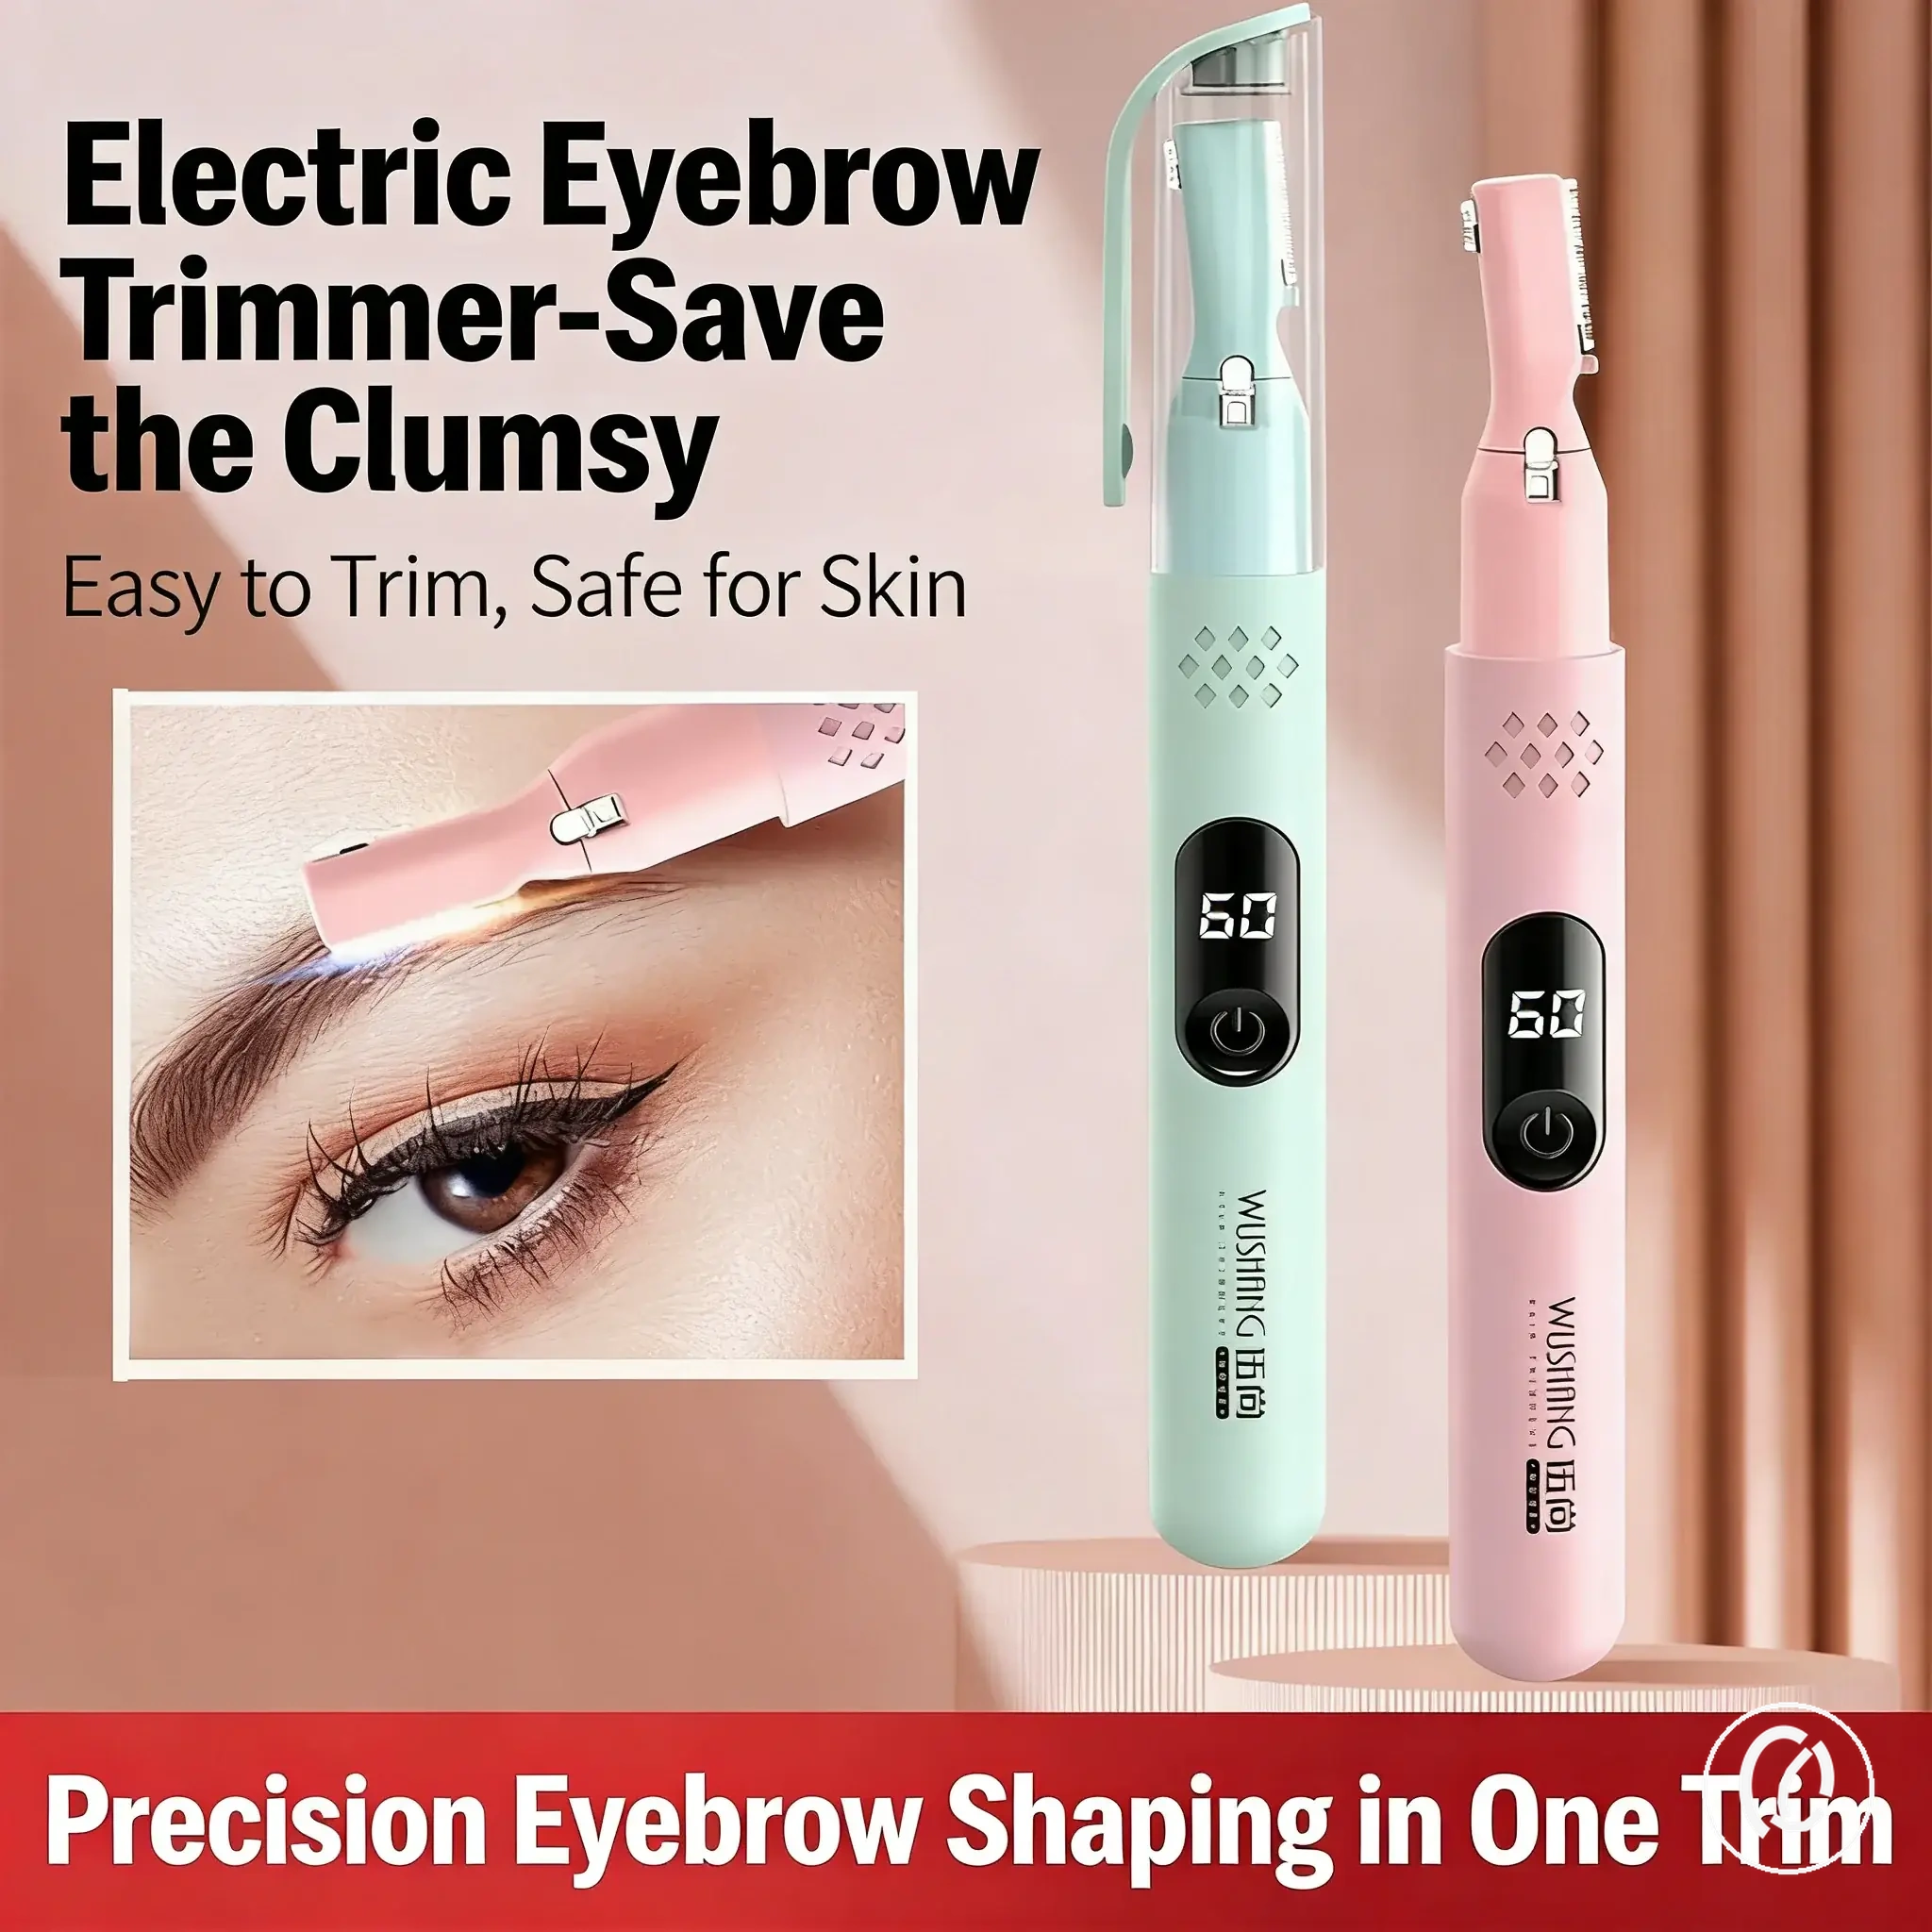
Here are product examples that may make comparison easier.
Here are product examples that may make comparison easier. Before buying, always review the compatibility criteria, essential features, and product details.
Storage Habits That Keep Tools Clean Between Uses
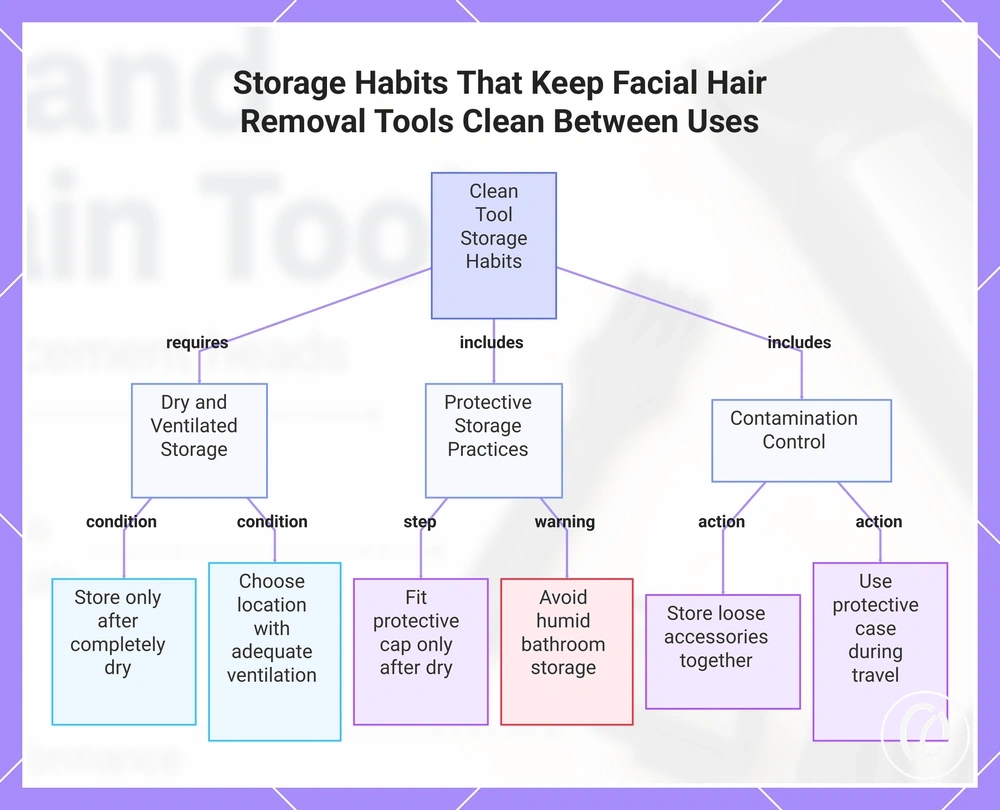
Storage habits keep facial hair removal tools clean between uses by storing the tool completely dry, separating it from residue sources, and protecting it from unnecessary contamination. Clean storage preserves the results of cleaning by controlling moisture and contact with contaminants, but it does not replace cleaning, sanitizing, or replacing worn parts. Store the tool only after every cleaned component is dry, then maintain the storage conditions below. :contentReference[oaicite:0]{index=0}
- Dry storage: Keep the tool in a dry place after it has air dried completely to preserve cleanliness and reduce moisture retention between uses.
- Ventilation: Choose a storage location with adequate ventilation so any remaining surface moisture can dissipate instead of being retained around the tool.
- Cap and case: Fit the protective cap only after the tool is dry, then place it in a clean case to reduce dust and accidental contact with other stored items.
- Bathroom humidity: Avoid storing the tool where repeated bathroom humidity exposes it to prolonged moisture, especially if airflow is limited.
- Loose accessories and contamination control: Store loose accessories together and keep the tool separate from dirty cosmetic items to improve contamination control between uses.
During travel storage, a protective case helps keep a clean, dry tool separated from other belongings, but it can trap moisture if the tool is packed before it has dried completely. Likewise, storing the tool in a humid bathroom without sufficient airflow can slow drying after cleaning. Allow the tool to dry fully before placing it into a storage case or returning it to an area affected by bathroom humidity to reduce the risk of trapped moisture. :contentReference[oaicite:1]{index=1}
Likewise, storing the tool in a humid bathroom without sufficient airflow can slow drying after cleaning.
This chart shows the key storage habits required to keep facial hair removal tools clean between uses, including dry storage, protective practices, and contamination control.
Cleaning Mistakes That Can Damage Facial Hair Removal Tools
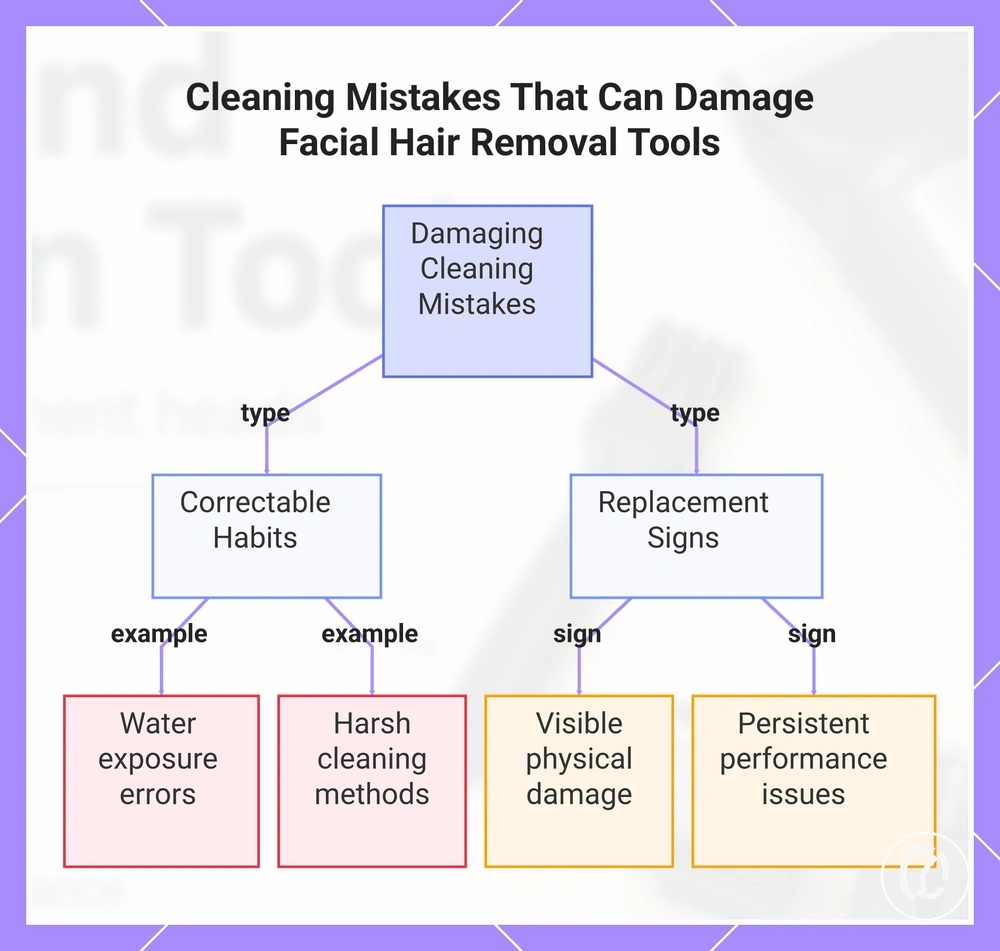
Cleaning mistakes that can damage facial hair removal tools most often involve excessive water exposure, unnecessary force, wrong chemicals, or poor drying. These actions can affect handles, charging contacts, blades, foils, coatings, and removable heads, while the severity and outcome remain model-dependent because approved cleaning methods differ by tool design. :contentReference[oaicite:0]{index=0}
Use the checklist below to distinguish habit correction from replacement signs.
A correctable cleaning habit is one that can be stopped before physical damage appears, such as reducing pressure, changing the cleaning medium, or drying wet parts completely before reassembly. A replacement or support issue becomes more likely when visible bending, cracking, corrosion, looseness, persistent pulling, or reduced performance remains after approved cleaning. Use the checklist below to distinguish habit correction from replacement signs. :contentReference[oaicite:1]{index=1}
- Rinsing non-rinseable handles: Water exposure around non-rinseable handles or charging contacts can reach areas not designed for wet cleaning. Keep the handle dry and rinse only removable parts that the manufacturer identifies as washable.
- Soaking electrical parts: Soaking a powered handle, battery compartment, or charging section exposes electrical parts to prolonged moisture. Use the manufacturer-approved dry method unless the complete tool is explicitly rated for rinsing or immersion.
- Using harsh cleaners: Harsh cleaners can affect blade surfaces, plastics, seals, or protective finishes. Use only the cleaning medium approved for the specific part, such as mild soap and water for a washable head or dry cleaning for a non-washable section.
- Scraping blades: Scraping blades or foils with a hard object applies force that can bend cutting elements, mark foil surfaces, or reduce performance. Remove residue with the supplied brush or another manufacturer-approved soft cleaning tool.
- Reassembling wet parts: Reattaching or storing wet parts can retain moisture around joints and internal surfaces. Allow every cleaned component to dry completely before reassembly, capping, or storage.
- Ignoring replacement signs: Dullness, persistent pulling, cracked heads, bent foils, loose attachments, corrosion, or reduced performance after cleaning are replacement signs rather than reasons for more aggressive cleaning. Stop the damaging cleaning habit and assess whether the compatible head, blade, foil, or guard requires replacement or manufacturer support.
This chart categorizes the main cleaning mistakes that damage facial hair removal tools into correctable habits and replacement signs.